There’s nothing quite like the frustration of firing up your pool jets on a hot Saturday afternoon, only to discover weak flow, strange noises, or jets spraying in completely wrong directions while the kids stand poolside waiting to swim. Pool jet malfunctions are more common than most homeowners realize, and they almost always trace back to preventable installation and setup errors. From choosing incompatible equipment to skipping critical calibration steps, these mistakes drain your wallet and your patience in equal measure.
This guide walks you through the most frequent pool jet pitfalls families encounter and delivers practical solutions you can act on immediately. Whether you’re installing new swim jets or troubleshooting an existing system, you’ll learn how to ensure compatibility with your pool, follow a proven step-by-step setup process, take advantage of free professional installation services, and confidently master remote control features. By the end, you’ll have everything needed to transform your pool into the reliable backyard oasis your family deserves.
The Most Frequent Pool Jet Mistakes and Their Simple Fixes
The number one error homeowners make is improper jet placement. When jets point too high, water sprays above the surface and creates turbulence without meaningful circulation. When they aim too low, flow stays trapped near the bottom while the upper water remains stagnant. The fix is straightforward: angle jets slightly downward at roughly 45 degrees and orient them in a consistent circular pattern around the pool perimeter to create a unified current.
Neglecting maintenance ranks as the second most costly mistake. Calcium deposits and debris accumulate inside jet nozzles over months, gradually restricting flow until output drops noticeably. A quarterly disassembly and vinegar soak restores full pressure in minutes. Equally damaging is ignoring water chemistry—unbalanced pH accelerates corrosion on jet fittings and internal seals, leading to leaks that require expensive repairs.
Perhaps the most preventable error is choosing incompatible jet models for your existing pump capacity. An undersized pump paired with high-flow swim jets produces disappointing, weak streams that barely move water. Before purchasing any jet system, verify your pump’s gallons-per-minute output against the jet manufacturer’s minimum flow requirements. This single compatibility check eliminates the frustration families experience when their new jets underperform expectations and saves hundreds in potential equipment swaps.
Understanding Pool Jets: Ensuring Swim Jet Compatibility for Your Pool
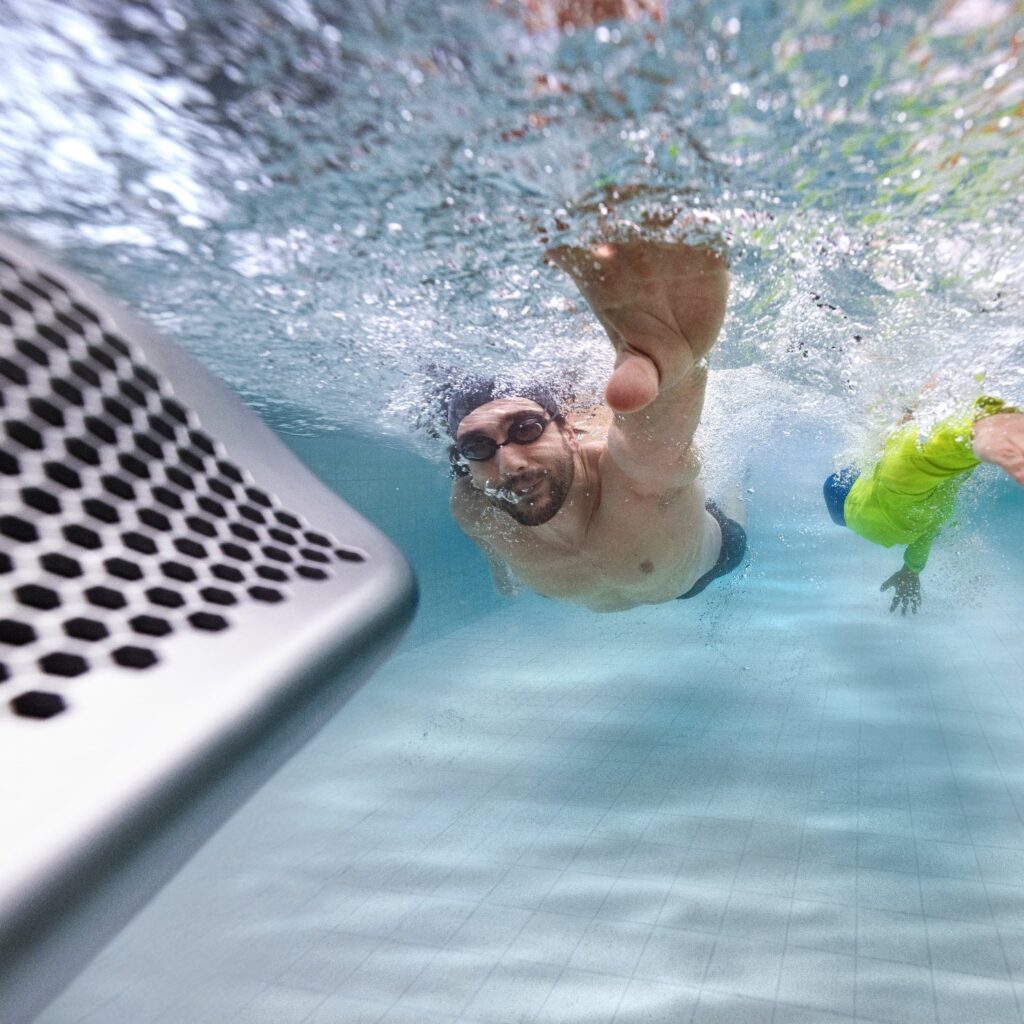
Pool jets serve two essential functions in your backyard setup: they circulate treated water to maintain even chemical distribution, and in the case of swim jets, they generate a powerful current that lets you swim in place without needing a full-length lap pool. Standard return jets push filtered water back into the pool through small openings in the walls, while dedicated swim jets use larger housings and higher-output nozzles to produce a broad, adjustable stream strong enough for resistance swimming and aquatic exercise.
Compatibility hinges on three critical factors that homeowners frequently overlook. First, pool size matters because a compact plunge pool requires far less flow volume than a full-size rectangular pool to achieve adequate circulation or a usable swim current. Second, your existing pump capacity must deliver enough gallons per minute to power the jets you select—most swim jets demand a dedicated pump separate from your filtration system. Third, your plumbing layout dictates whether installation is straightforward or requires significant rework; older pools with narrow return lines may need upsized piping to handle increased flow without creating back-pressure that strains equipment. Before committing to any jet system, measure your pool dimensions, document your current pump specifications, and photograph your plumbing configuration so you can cross-reference these details against manufacturer compatibility charts and avoid costly mismatches.
Step-by-Step Guide to Installing and Configuring Your Pool Jets
A successful pool jet installation depends on methodical preparation, careful execution, and thorough testing. Rushing any phase invites leaks, underperformance, and return trips to the hardware store. Follow this structured approach to get your jets running correctly the first time.
Pre-Installation: Planning and Preparation Checklist
Start by measuring your pool’s length, width, and depth to confirm the jet placement locations will deliver even coverage. Review your jet system’s compatibility requirements against your pump specs and plumbing diameter—this prevents the single most expensive installation mistake. Gather your tools in advance: adjustable wrenches, Teflon tape, silicone sealant, a level, PVC primer and cement if new plumbing connections are needed, and a pressure gauge. Sketch your intended jet layout on paper, positioning jets to create a consistent directional flow pattern rather than competing currents that cancel each other out.
See also: The Future of Bedbug Control: New Technologies
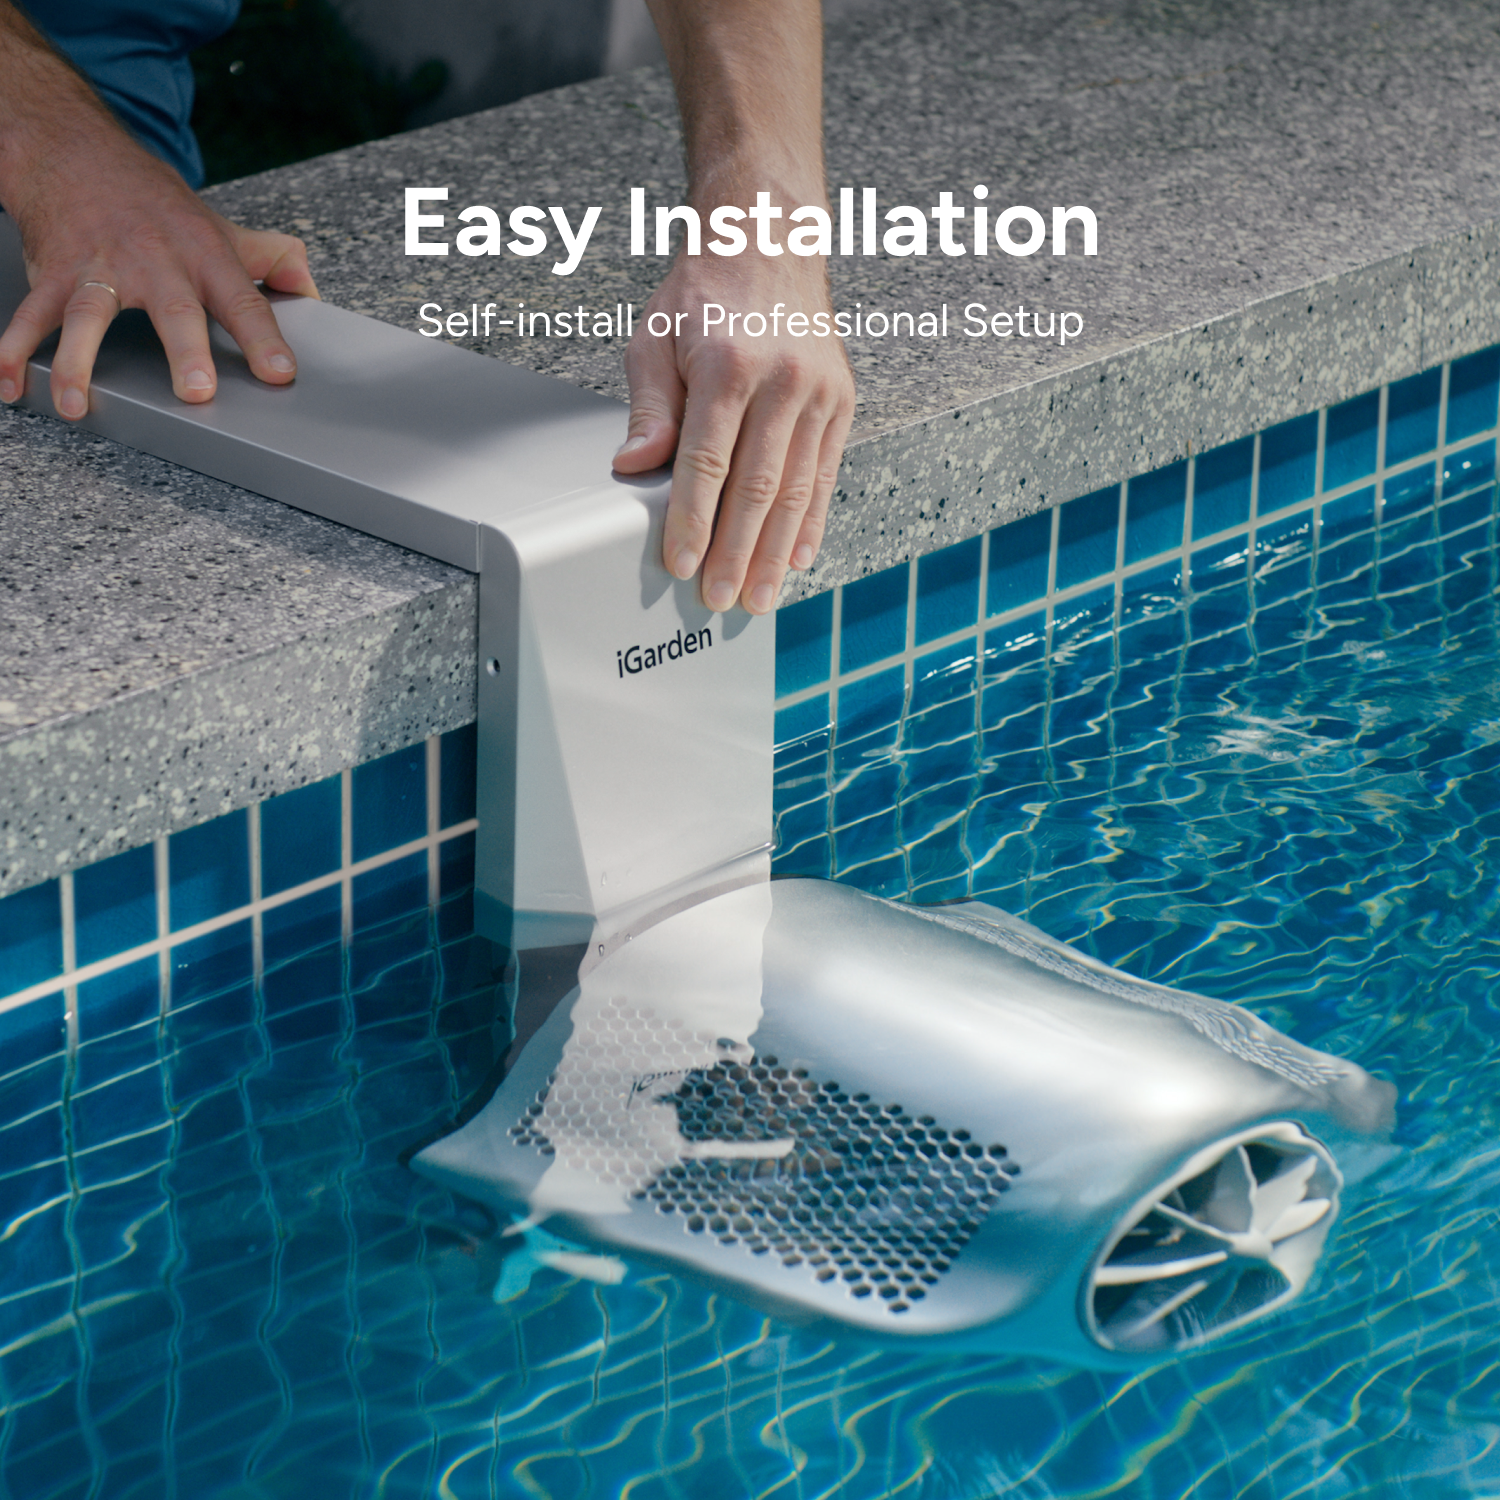
Installation Process: Connecting and Securing Pool Jets
Unbox each jet assembly and inspect fittings for manufacturing defects before starting. Insert jet housings into the designated return openings, ensuring gaskets seat flush against the pool wall with no gaps. Apply Teflon tape to all threaded connections and hand-tighten before finishing with a wrench—overtightening cracks plastic fittings. Connect supply lines from your pump to the jet manifold, using silicone sealant at every union joint. If your system requires a dedicated pump, mount it on a level concrete pad within the manufacturer’s recommended distance from the pool wall and wire it through a GFCI-protected circuit. Double-check that all valves are in the closed position before proceeding to testing.
Post-Installation: Testing, Calibration, and Initial Maintenance
Open valves gradually and power on the pump at its lowest setting, watching each connection point for drips or seepage over a full five minutes. Increase flow incrementally to operating pressure while monitoring your pressure gauge—readings above the manufacturer’s maximum indicate a blockage or sizing issue. Adjust each jet nozzle to your desired angle, confirming the combined flow creates a smooth circular current across the pool surface. Record your baseline pressure reading and flow settings for future reference. Establish a monthly maintenance schedule that includes inspecting seals, cleaning nozzle screens, and verifying pressure remains within normal range to catch small problems before they escalate.
How to Access and Benefit from Free Installation Services
Many pool jet manufacturers and authorized dealers offer free professional installation as part of their purchase packages, yet a surprising number of families never take advantage of these services simply because they don’t know they exist. Free installation typically covers labor, equipment positioning, plumbing connections, and initial system testing—essentially everything outlined in the DIY process above, handled by certified technicians who install these systems weekly. To find reputable providers, check the manufacturer’s website for authorized installer directories, read verified customer reviews, and ask whether the service includes a post-installation inspection within 30 days.
The advantages extend well beyond convenience. Professional installers catch compatibility issues before they become expensive problems, ensure warranty-compliant connections, and calibrate flow rates with precision tools most homeowners don’t own. Timing matters here—many companies bundle free installation with summer promotional periods when demand peaks and dealers compete aggressively for business. Contact providers in late spring to lock in these offers before schedules fill up. By combining a quality jet system with expert installation at no additional labor cost, your family gains peace of mind knowing the setup meets manufacturer specifications and will perform reliably from day one.
Mastering Your Pool Jets: Setting Up Remote Control Features
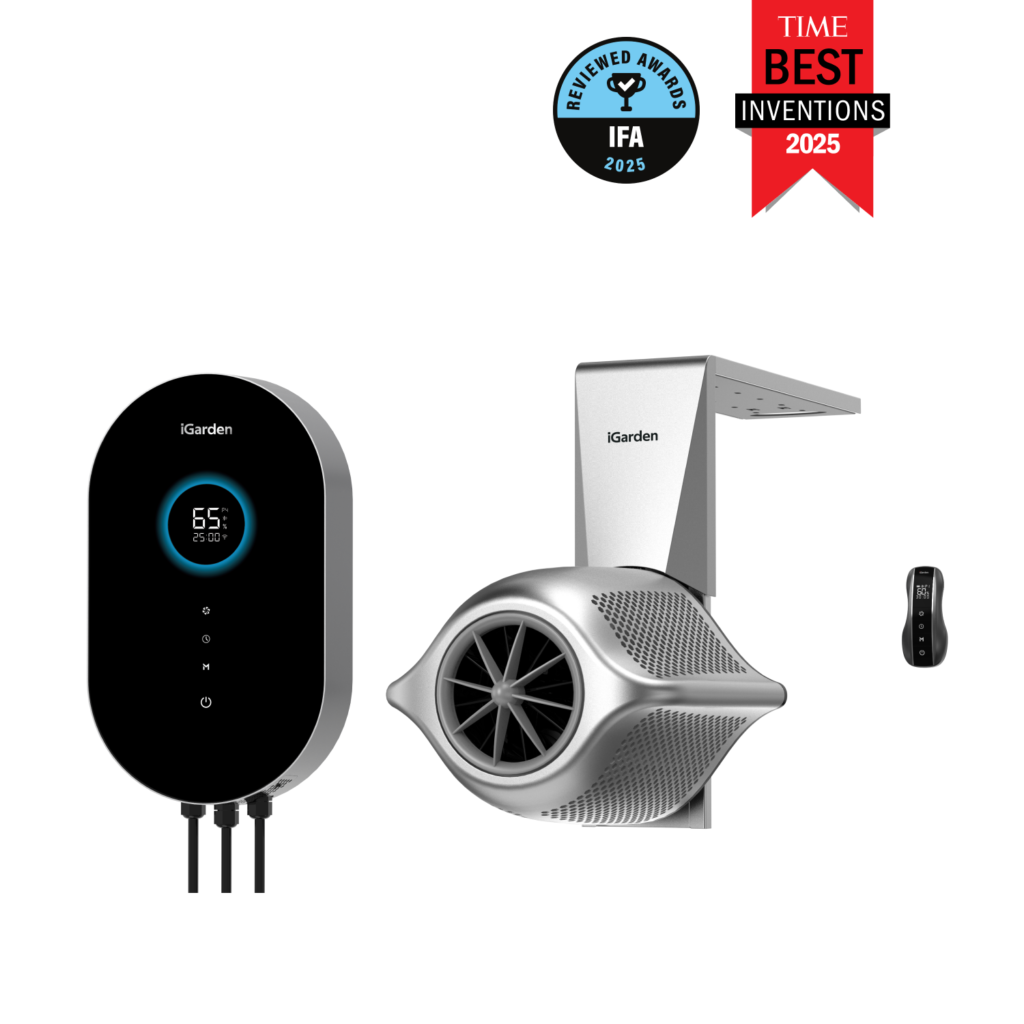
Modern swim jet systems offer remote control capabilities that transform how your family interacts with the pool. Wireless handheld remotes and smartphone apps—including smart home platforms like iGarden—let you adjust jet speed, direction, and scheduling without walking to the equipment pad, a genuine convenience when you’re already in the water or supervising kids from a lounge chair. Setting up these features starts with pairing your remote device to the jet controller, which typically involves holding a sync button on the control box while activating the remote within range. Once paired, configure your preferred speed settings for different family members: a gentle current for younger swimmers and a stronger resistance flow for adults training laps.
Timer functions deserve special attention because they let you program automatic shutoffs that prevent pumps from running unnecessarily and save energy. For family-friendly use, set a maximum speed limit through the app’s parental controls so children cannot accidentally crank jets to full power. If your remote loses connection or becomes unresponsive, start by replacing batteries, then re-pair the device by resetting the control module. Interference from nearby Wi-Fi networks occasionally disrupts wireless signals, so repositioning your router or switching to a dedicated frequency channel usually resolves persistent dropout issues.
Smart Savings: Leveraging Summer Sales for Pool Jet Upgrades
Pool equipment retailers follow predictable seasonal pricing cycles, with the deepest discounts appearing during early summer promotional events when manufacturers push new inventory and dealers compete for homeowner dollars. To capitalize on these windows, sign up for email alerts from authorized dealers starting in April and compare at least three brands before committing. Look beyond headline discounts—genuine deals bundle equipment with warranties and installation rather than simply slashing standalone unit prices. The smartest strategy combines a summer sale purchase with the free installation services discussed earlier, effectively eliminating both markup and labor costs in a single transaction. This approach lets families upgrade to higher-performance swim jets or add remote control capabilities they might otherwise skip due to budget constraints.
Your Roadmap to Reliable Pool Jet Performance
Getting your pool jets right doesn’t require engineering expertise—it demands attention to a handful of critical details that most families overlook in their excitement to start swimming. The path to reliable, powerful jet performance starts with avoiding the common mistakes we covered: improper placement, neglected maintenance, chemistry imbalances, and equipment mismatches. From there, confirming compatibility between your pool dimensions, pump capacity, and plumbing layout prevents the costly surprises that derail so many installations.
Following a structured setup process—from careful pre-installation planning through methodical testing and calibration—ensures your system performs as designed from the first swim. Take advantage of free professional installation services when available, as expert hands eliminate guesswork and protect your warranty. Once everything runs smoothly, mastering remote control features adds convenience and safety for every family member. And timing your purchase around summer promotional periods stretches your budget further than you might expect. Apply this guide as your roadmap, consult a certified installer when questions arise, and step into this pool season knowing your jets will deliver exactly the experience your family deserves—every single time you flip the switch.