In the fast-paced startup ecosystem, your product demonstration is your most valuable currency. Whether you are prepping for a high-stakes venture capital pitch, an angel investor meeting, or a public product launch, everything hinges on your local development environment running flawlessly. Yet, technology has a knack for failing at the worst possible moment.
Imagine your team spending consecutive all-nighters perfecting an app demo, only to plug in your external storage drive and face an ominous error message: “Drive is not accessible. The file or directory is corrupted and unreadable.” When your primary code repositories, local database dumps, or raw media assets become trapped behind a logical error, you need a precise strategy to resolve the issue. This guide details how to fix corrupted hard drive complications safely, stabilize your storage environment, and deploy specialized tools to rescue your mission-critical data.
The Root Causes of Storage Corruption in High-Performance Workloads
Before executing terminal commands or running repair scripts, a technical leader must diagnose why a hard drive or solid-state drive (SSD) corrupts in the first place. When developers run intensive local Docker containers, compile massive software builds, or manage local virtual machines, their storage hardware undergoes severe read/write stress.
Several factors typically trigger drive corruption during these heavy operations:
File System Metadata Corruption: Abrupt power losses, forced reboots, or accidental disconnections while a local database writes data can corrupt the Master File Table (MFT) in NTFS or the Catalog File in HFS+. When metadata breaks, the operating system can no longer map the physical sectors where your files reside.
Bad Sector Accumulation: Mechanical hard drives develop physical bad sectors over time, while SSDs experience flash memory cell degradation. If vital compilation files land on these failing sectors, the entire directory tree can freeze.
Improper Partition Unmounting: Removing an external NVMe drive or SSD while a background developer tool or IDE is still caching data can truncate the partition layout, turning a healthy drive into unallocated or RAW space instantly.
How to Fix Corrupted Hard Drive Structures via Native Diagnostic Tools
If your storage drive exhibits logical errors but still registers under your operating system’s device manager, you can utilize native administrative utilities to repair the underlying directory architecture.
Method 1: Execute a Controlled Command-Line Volume Repair
The Windows operating system includes a robust tool called Check Disk (chkdsk) that can scan, verify, and repair logical file system errors. When determining how to fix corrupted hard drive partitions safely, you should execute this utility from an elevated interface.
- Press the Windows Key + X hotkey combination to open the Power User menu.
- Select Terminal or Command Prompt from the list to launch the interface with elevated permissions.
- Type the exact command string: chkdsk E: /f /r (Replace E: with the precise drive letter assigned to your corrupted storage volume).
- Press Enter to initiate the execution.
The /f parameter instructs the engine to fix any logical errors it discovers on the disk volume. The /r parameter searches for physical bad sectors and attempts to recover readable information from those affected areas.
Critical Warning: If your drive is clicking, grinding, or experiencing severe physical overheating, do not execute the chkdsk command. Forcing a physically failing storage disk to repeatedly read data sectors can grind the internal platters, causing permanent, irreversible data obliteration.
Method 2: Adjust System Policies to Mitigate Cache Write Risks
If you frequently use external solid-state storage arrays for local code deployments, you should configure your system settings to avoid metadata corruption during unexpected disconnections.
- Press the Windows Key + R hotkey shortcut to open the Run dialog box.
- Type devmgmt.msc and press Enter to initialize the Device Manager utility.
- Expand the Disk drives tree hierarchy, right-click your external storage hardware, and select Properties.
- Navigate to the Policies tab along the top navigation menu.
- Under the removal policy settings framework, choose Quick removal (default).
This specific configuration disables write caching on the external device, ensuring that data writes directly to the flash memory cells immediately. While this setting slightly lowers peak file transfer bursts, it prevents major partition table crashes if a teammate accidentally yanks out a USB cable during a busy sprint.
Reclaiming Lost Dev Assets with PandaOffice Drecov
When native operating system commands fail to reconstruct a broken file table, you must stop attempting logical repairs. Forcing a damaged drive to rebuild its volume architecture often rewrites crucial memory sectors, which can overwrite the very files you need to rescue. To bypass operating system barriers without risking your source code or database files, you need a specialized, read-only data extraction tool. PandaOffice Drecov provides a professional-grade data recovery solution tailored for high-stakes scenarios where time is money.
Instead of relying on fragile operating system directory trees, PandaOffice Drecov communicates directly with the raw storage sectors of your drive. It reconstructs fragmented code repositories, unpacks compressed archives, and retrieves deleted media assets without modifying a single bit of your original data.
The Immutable Law of File Preservation
Before you run any scanning utility on a compromised storage device, you must implement the golden rule of data recovery: Never write new data to the target volume.
Important Warning: Do not download data recovery tools or save temporary files directly onto the drive you are trying to repair. Doing so will overwrite the invisible, deleted files waiting to be rescued. Always install PandaOffice Drecov onto an independent system drive or external flash memory stick to maintain total environment isolation.
Step-by-Step Data Rescue Blueprint
PandaOffice Drecov features a refined, streamlined user experience designed to deliver enterprise-grade performance without technical friction. Follow this three-step blueprint to salvage your startup’s development assets:
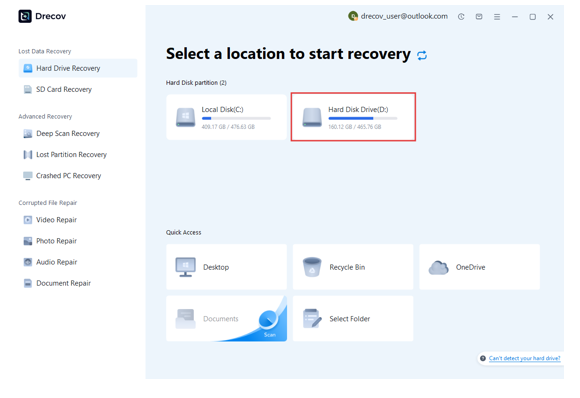
Step 1: Map and Initialize the Target Drive
Launch PandaOffice Drecov on your computer. Locate the section labeled Hard Disk Drives or External Devices. Select the drive letter corresponding to your corrupted storage unit and click the Scan button.
Step 2: Filter and Analyze Reconstructed Assets
PandaOffice Drecov initiates a multi-layered scanning sequence, executing a rapid directory verification followed by an intensive deep sector analysis. You can track the progress in real-time and inspect files as the engine identifies them.
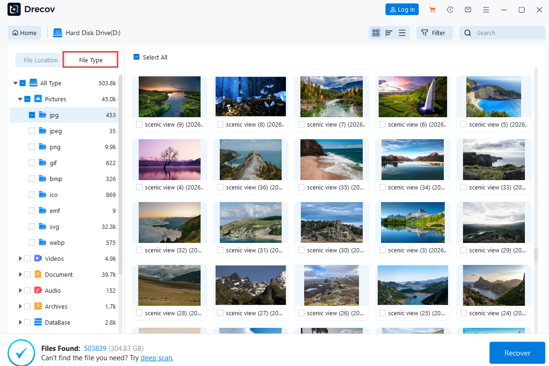
Use the File Type navigation tree on the left control panel to filter out irrelevant system files. You can isolate developer-specific extensions such as .sql, .db, .json, or raw project files.
See also: Logo:-Bpioagsaca= Ravenclaw
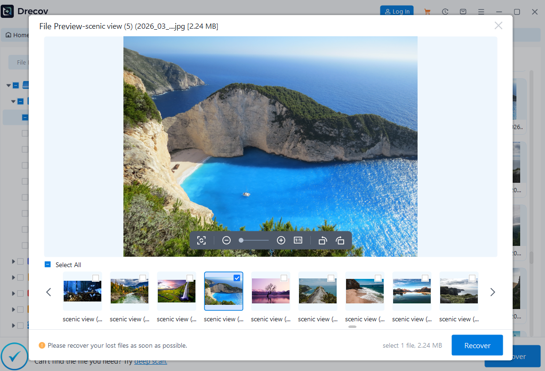
Step 3: Preview Integrity and Execute Secure Extraction
Double-clicking a recovered text file, code module, or media asset renders the file composition immediately, allowing you to verify its integrity before finalizing the process.
Pro-Tip Warning: When picking a storage location for your recovered files, you must select a separate, completely healthy drive or a secure cloud repository. Never save your salvaged files back onto the corrupted drive, as this will trigger severe sector contention and destroy remaining recoverable data.
Establishing Long-Term Storage Resilience for Your Team
Once your engineering files are safely recovered and your team clears its immediate deadline, you must put measures in place to prevent future hard drive corruption from bringing your workflow to a halt.
Automate Registry-Driven Storage Backups: Ensure Windows handles volume mounting safely by auditing your system architecture. Open the Windows Registry Editor by typing regedit into the Start menu search bar. Move down the directory path to HKLM\System\CurrentControlSet\Control\StorageDevicePolicies. If this key path does not exist, right-click the parent directory to create it. Within this folder, create a new DWORD (32-bit) value, name it WriteProtect, and keep its value set to 0 to ensure optimal data throughput while maintaining stable connection protocols.
Implement a Local Git Push Strategy: Never allow developers to keep code uncommitted on local drives overnight. Maintain a strict policy of pushing daily active branches to an off-site, cloud-hosted remote repository like GitHub or GitLab.
Deploy a 3-2-1 Backup Strategy: Keep 3 distinct copies of your operational data, stored across 2 different media types, with at least 1 copy stored in an off-site cloud bucket.
Conclusion
Discovering that your startup’s core demo data is locked behind a corrupted storage volume can cause immediate panic, especially when a critical investor pitch is looming. However, knowing how to fix corrupted hard drive structures using command-line diagnostic tools like chkdsk can quickly stabilize minor software glitches.
When deep file system metadata collapses under heavy development workloads, relying on a robust, read-only extraction engine like PandaOffice Drecov ensures your intellectual property remains safe. By implementing proactive data protection strategies and keeping professional recovery software on hand, you can protect your engineering assets, minimize expensive team downtime, and keep your business moving forward.